Four months of outback driving with a magnetic Starlink Mini mount
Internet access is an important part of my job as a travel journalist. When I’m camped beyond mobile coverage, I still need to check road and weather conditions, research the next destination and send content to editors.
That’s why the Starlink Mini joined me on my latest trip. Its compact size, built-in WiFi router, and reasonable power demands made it a natural fit for my Isuzu D-Max and Alu-Cab ModCAP Camper. But I soon discovered that owning the Starlink was the easy part. I still had to work out where to put it and how to keep it powered and operational – not just when set up at camp, but also while driving.
STARTING SIMPLE
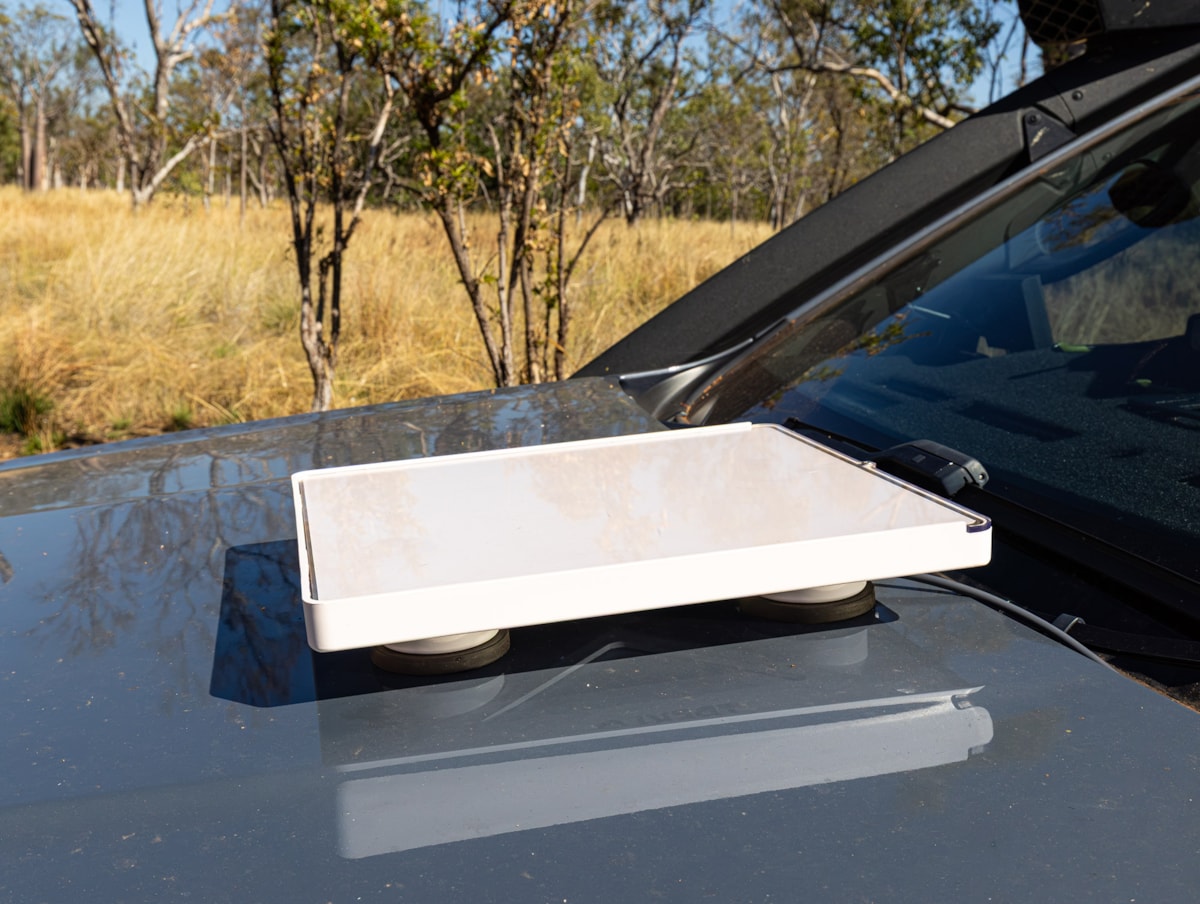
Campervan Builders supplied a Treklo Starlink Mini Flat Shielded Magnet Mount. The Starlink sits inside an injection-moulded base beneath a polycarbonate shield, with four rubber-coated N50 magnets attaching firmly to a receptive surface, such as a car body.
My first solution was to put it on the bonnet. I powered it with a 165W USB-C power socket and a five-metre Nextech USB-C to DC cable. The adaptor plugged into the D-Max’s 12V accessory socket. It was quick and easy, but it had faults. Running the cable through the passenger door seal let dust into the cab. The adaptor could also work loose in the accessory socket, instantly turning off the Starlink.
Another problem arose when I used one of the adaptor’s spare USB ports. Dillon Excell from Campervan Builders told me that plugging in another device could cause the adaptor to reconfigure how it distributed power. “The Starlink Mini can lose power for a few milliseconds, which may be enough to cause it to reboot,” he said. Dillon’s advice was to plug in the other devices first and the Starlink last. That helped, but sharing the adaptor was never my long-term answer.
OFF THE BONNET
I have seen Starlink Minis propped on dashboards or mounted against windscreens. Neither location works for me. The unit can obstruct the driver’s view, become a projectile during sudden braking or sit in the path of a passenger airbag.
I also learnt that state and territory vehicle standards may apply to bonnet-mounted accessories. A rigid object on the bonnet could create a pedestrian safety risk or fail external projection requirements. That was enough for me to move mine onto the D-Max’s roof, in the space between the windscreen and my rooftop camper. It is out of my line of sight, has a clear sky view above the vehicle, and has provided a useful connection while travelling.
FOUR MONTHS OF PUNISHMENT
The Treklo mount has now crossed the Gibb River Road, completed the Canning Stock Route and tackled the Simpson Desert. It has endured thousands of kilometres of corrugations, dust, rain and rough outback roads without moving.
Being magnetic also means it isn’t permanently locked in one position. When trees interfere with reception, I can lift it from the roof and move it into a clearer patch of sky. I never put it directly on the ground. In the Pilbara, magnets quickly attract iron-rich dust and small metallic fragments. Putting the mount back on the D-Max without cleaning the feet could damage the paint or paint-protection film, so I use a small folding table as a portable stand.
The polycarbonate shield offers useful protection, but it’s not foolproof. Rain can work its way underneath when the mount is sitting flat. Nothing has been damaged so far, but I check it after wet weather just in case.
SORTING THE POWER
Campervan Builders later sent me a Treklo K2 Pro Boosted Power Supply and five-metre cable. The K2 Pro takes power from a 12V or 24V system and delivers a stable 30V output to the Starlink Mini.
I mounted it inside the Alu-Cab and connected it to my Projecta INTELLI-Grid 100 Compact power management system. The Starlink now has a dedicated power supply, with no accessory plug to shake loose and no other USB device interrupting it.
The K2 Pro’s two wireless remotes are a handy inclusion. I can turn the Starlink on or off from the cab, my bed or beside the campfire, even though the unit is tucked away. I still need to install a sealed cable gland through the camper (for weather protection) to complete the permanent setup.
THE VERDICT
After four months of genuine outback use, I trust the Treklo mount to hold and protect my Starlink Mini. I can move it when trees get in the way, and the K2 Pro has ended the frustrating power interruptions.
The magnetic feet need regular cleaning, and the shield is not completely rainproof, but neither issue outweighs the convenience. This combination has turned my Starlink Mini into a practical part of the D-Max, rather than another piece of equipment to set up every night.
SPECIFICATIONS
Treklo Starlink Mini Flat Shielded Magnet Mount
MATERIALS Injection-moulded base, polycarbonate shield, rubber-coated N50 magnets
DIMENSIONS 308mm x 269mm x 55mm
WEIGHT 1.12kg
WARRANTY 2 years
RRP $234
Treklo K2 Pro Boosted Power Supply
POWER 10 to 28V input, 30V output, 120W maximum
MATERIALS Housing IP67-rated
DIMENSIONS 150mm x 110mm x 40mm
WEIGHT 670g
WARRANTY 1 year
RRP $249
treklo.com.au
The Treklo mount and K2 Pro were provided by Campervan Builders.